Water washing
Water washing is a way to remove soap and other contaminants from reacted biodiesel. Typically this involves mist spraying water over the biodiesel, or bubbling air through water with the biodiesel floating on top.
Water washing is a different process to water prewash which is a form of water washing carried out in the processor before the glycerol is drained off.

Even the best quality biodiesel will contain some level of contaminants. Many of these are water soluble such as soaps, glycerol, methanol and catalyst. Water washing removes these contaminants quite effectively however it leaves the biodiesel containing trace amounts of water which needs to be removed by an additional drying process. Water washing should ideally be performed around 18 hours after the glycerol is drained. This gives the bulk of contaminants time to settle out and makes the job of washing easer and quicker. It is preferable that this settling is carried out in a separate tank with the biodiesel then being transferred to a wash tank for the washing process.
Basic mist washing tank


Mist washing, as the name implies, comprises spraying a very fine water mist on to the top of the biodiesel and letting it fall, in minute droplets, to the bottom of the tank collecting soluble contaminants on the way.
Provided the spray is fine enough, mist washing is unlikely to create an emulsion but care be taken especially in the early stages. There are numerous spray nozzles available from industrial suppliers, but home brewers have had great success by using nozzles from garden sprayers and plant misting systems. Hand held sprayers with glass reservoirs and brass fittings are easily adapted by cutting the off the brass pipe and soldering it to the wash tank water supply pipe work.
Start with a low pressure and very fine spray pattern, slowly increasing the pressure and flow as washing proceeds. This gives the water a chance to dissolve the soaps and glycerol and carry them to the bottom of the tank without forming an emulsion.
Mist washing generally takes 6 - 8 hours and with the set up shown left; the water should be periodically drained to prevent the tank from overflowing. The wash water drain valve can be cracked open to allow a continual outlet for the water, but care should be taken that the tank doesn’t drain to a point were the biodiesel is lost. From this point of view a ‘GL wash tank’ is a far better arrangement and is shown below.
Towards the end of the washing samples should be taken and a 50/50 soap test made to determine if the washing is complete. Once a satisfactory result has been achieved, washing can stop. It’s worth noting that the biodiesel may well look cloudy at this stage.
If reacted completely and washed thoroughly, biodiesel should clear within a matter of hours after washing. This is not necessarily an indication that it’s dry so the Biodiesel should be heated to around 50 – 60°C for a couple of hours. To aid this process a bubbler supplied from an aquarium air pump can be placed in the tank. Any water that has dropped out during this process should be drained off. See also Drying wet biodiesel.
GL wash tank


Originally designed by Graham Laming and dubbed 'the never overflowing wash tank’, this design automatically drains the same volume of water as is being introduced.
The simple layout keeps the level in the tank fixed. As you add water via a mist head, it passes through the biodiesel, taking methanol, soap and glycerol with it, and then collects in the bottom of the tank, where it is forced up the overflow pipe, by the weight of biodiesel on top of it, draining off as much water as is added. The vent on the overflow pipe prevents the arrangement from siphoning uncontrollably.
The biodiesel outlet tube on the left is bent over with a 180° return bend plumbing fitting, to prevent water from entering the biodiesel drain pipe during washing.
The tank should be filled with water first to about ½ way between the biodiesel drain tube and the bottom of the tank. This should be around 15% of the tank capacity. The biodiesel can the be added and washing can commence as above This system will work so long as the wash water can freely pass through the overflow tube. Therefore, do not use this system in winter, where freezing of either the biodiesel or the water may occur. Use a large bore drain pipe to minimise the risk of it becoming blocked.
To work out where to drill the tank for the overflow pipe, fill the tank about 15% full of water and make a mark. Add the same volume of water as your biodiesel batch size, make another mark and drain the tank. Measure the distance between the two marks and divide by 1.14. This new dimension is the height of the centre of the overflow above the lower mark.
An alternative twist to this design is to put all the overflow pipework outside the tank, with only a water take-off at the bottom. The height of the point of overflow remains the same but without having to fit a hole higher up the tank.
Bubble wash tank

Bubble washing was devised by Idaho University in the USA and is an ingenious and effective method of washing which uses less water and is less likely to cause emulsions than mist washing.
Numerous, fine bubbles are created within the water layer beneath the biodiesel using a bubbler and an aquarium air pump or small compressor. The bubbles rise to the surface, carrying with them a thin film of water. Upon reaching the surface the bubbles burst, releasing the water, which then sinks back through the biodiesel. In comparison to mist washing, this method allows double the time for contact between biodiesel and water.
Once your biodiesel has passed the 3/27 test and all the glycerol has been removed you can then transfer the fuel to your wash tank. Your wash tank, if in your shed, should ideally be sealed and connected to your vent system so as not to liberate methanol fumes into your workspace. If your plant is outside in the open make sure you are not exposed to fumes during the transfer.
The next stage is to carefully and slowly add some water to the fuel. Add approximately 10% of the biodiesel volume. You then need to turn on the air pump and introduce some bubbles by using a control valve and a ceramic air stone. (If you use an air stone made from a composite material there is a strong likelihood that it will dissolve in contact with the fuel.) Extreme care should be taken in the initial washes with the volume of air as the fuel/water mix does have a tendency to emulsify if the bubbles are too aggressive. We are talking GENTLE here.
After a couple of hours stop the air pump and allow the, now, soapy water to completely settle. Drain off the water and repeat the process. As the washing process progresses you should be able to increase the rate at which the air is introduced, but beware, if you turn up the air too soon the chances of an emulsion are greatly increased. You really need to be patient with this method.
When the clarity of the water coming out is the same as the water going in you may wish to perform a titrated soap test in order to determine the PPM's of soap in the finished fuel. If you have the facility (a pump and a heat source) in your set up, a hot pump wash can be beneficial in lowering the PPM's of soap even further.
The next stage is to dry the fuel. Be sure that you have drained off all the free water and turn on your heat source. Depending on your set up, your wash tank or wash system should have a heater. Heat the fuel to at least 60°C with the air pump running. You may well hear the popping as suspended water around the heater turns to steam.
When the fuel has reached your desired temperature turn off the heat source and bubble until it reaches ambient. During drying the use of a diffuser and pump can speed up the process. Air flowing through the hot fuel will allow any moisture to be liberated to atmosphere. Any larger droplets of water will collect at the bottom of the tank and can be removed via the drain valve.
- A typical bubble washing set-up.
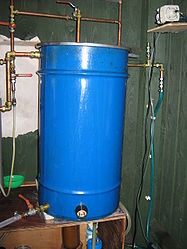
External view of bubble wash tank. Source: NigelB.
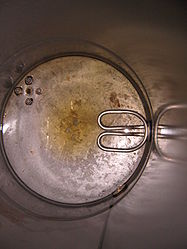
Internal view of bubble wash tank. Source: NigelB.
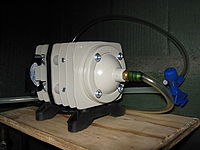
Large aquarium air pump. Source: NigelB.
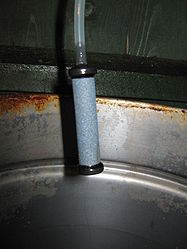
Ceramic airstone or bubbler. Source: NigelB.


